[Mini2440] 搭建 Linux 开发环境

一. 烧写 Superboot

1.1 相关资料获取

本小节主要讲述如何使用韦东山老师开发的 oflash 工具配合 OpenJTAG 下载器下载友善之臂光盘提供的 superboot 到 mini2440 开发板的 nor flash 上。

为什么要下载 superboot 到 nor flash 上?
是因为 superboot 可以配合 FriendlyARM 开发的 miniTools 工具快速烧写系统到 mini2440 开发板上。

涉及到的资源有:

  • oflash 工具
  • OpenJTAG 驱动程序
  • superboot 镜像

如何获取这些资源:

  • oflash 和 OpenJTAG 驱动可以在韦东山老师的 JZ2440 开发板光盘资料中获取。
  • superboot 镜像可以在友善之臂 mini2440 开发板光盘资料中获取。

对应的光盘资料可以去对应的论坛获取,论坛网址如下:

1.2 安装 oflash 程序

安装 oflash 工具

oflash 安装包路径:JZ2440光盘\烧写工具\裸机\eop&op\调试工具\01.OpenOCD with GUI setup.exe
使用管理员权限安装 OpenOCD with GUI setup.exe 即可在 cmd.exe 命令行里执行 oflash 程序。

验证是否安装成功

依次执行:Win + R -> 输入 cmd 调起控制台 -> 输入 oflash 执行,出现以下提示说明 oflash 安装成功。

1
2
3
4
5
6
7
8
9
10
11
12
13
14
15
16
17
18
19
20
C:\Users\user>oflash

+---------------------------------------------------------+
| Flash Programmer v1.5.2 for OpenJTAG of www.100ask.net|
| OpenJTAG is a USB to JTAG & RS232 tool based FT2232 |
| This programmer supports both of S3C24X0 & S3C6410 |
| Author: Email/MSN(thisway.diy@163.com), QQ(17653039) |
+---------------------------------------------------------+
Usage:
1. oflash, run with cfg.txt or prompt
2. oflash [file], write [file] to flash with prompt
3. oflash [-f config_file]
4. oflash [jtag_type] [cpu_type] [flash_type] [read_or_write] [offset] [file]
Can't open cfg.txt, you should follow the prompt

Select the JTAG type:
0. OpenJTAG
1. Dongle JTAG(parallel port)
2. Wiggler JTAG(parallel port)
Enter the number:

1.3 安装 OpenJTAG 驱动

手动安装 OpenJTAG 驱动

OpenJATG 驱动程序路径:JZ2440光盘\烧写工具\裸机\eop&op\驱动\OpenJTAG*
将 OpenJTAG 插入电脑 -> 右键我的电脑 -> 管理 -> 设备管理器。可以看到其他设备里面有两个 USB <==> JTAG&&RS232 设备,但是旁边有感叹号,说明这两个设备并没有驱动。

图1

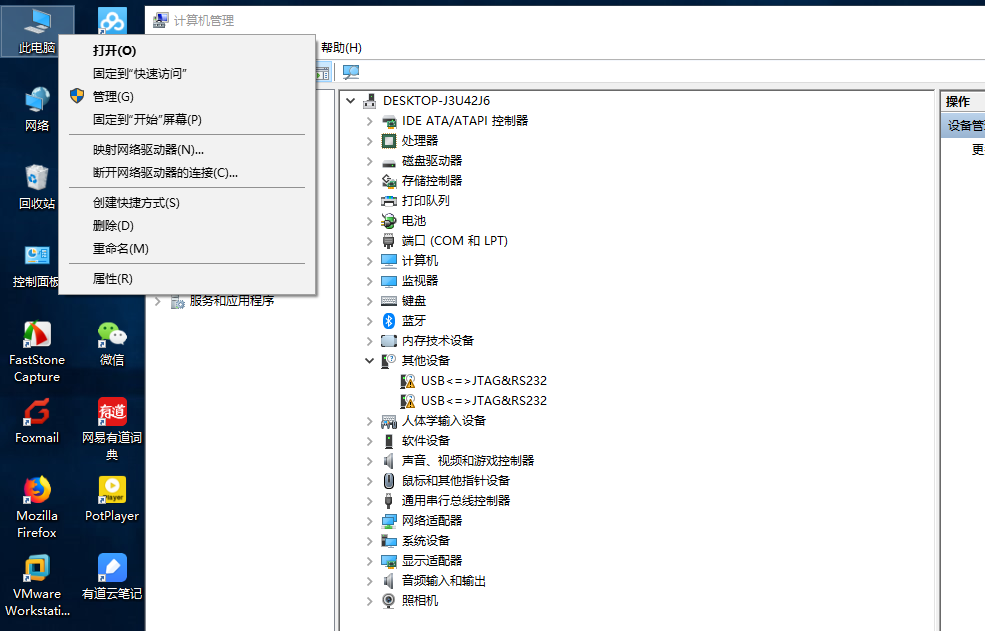
手动去安装 OpenJTAG 的驱动程序,右键 “USB <==> JTAG&&RS232” -> 更新驱动程序 -> 浏览计算机以查找驱动程序 -> 路径选择到 OpenJATG 驱动文件夹 -> 点击下一步,开始安装驱动。
但是,报了一个这样的错,文件的哈希值不在指定的目录文件。

图2

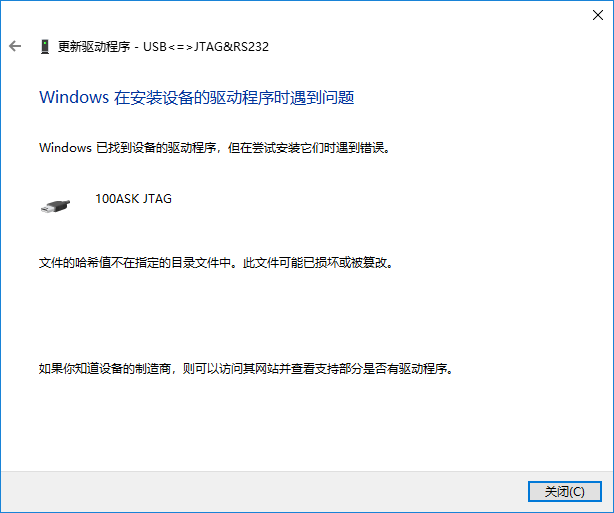
解决 OpenJTAG 驱动安装不上的问题

百度查了一下,原因是因为老设备的驱动没有更新,和新系统 Win 8 或 Win 10 系统不兼容,没得到数字签名通过。要正常安装驱动程序,需要强制关闭数字签名。
怎么操作:
开始菜单 -> 设置 -> 更新和安全 -> 恢复 -> 立即重启 -> 疑难解答 -> 高级选项 -> 启动设置 -> 重启 -> 电脑重启后,出现选择界面,F7选择禁止验证驱动签名。
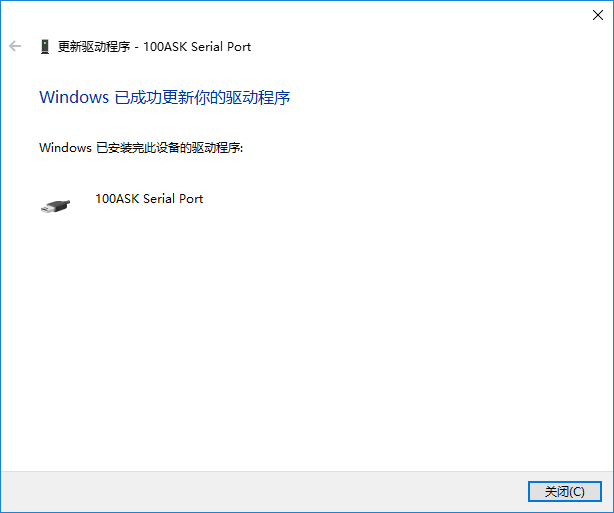
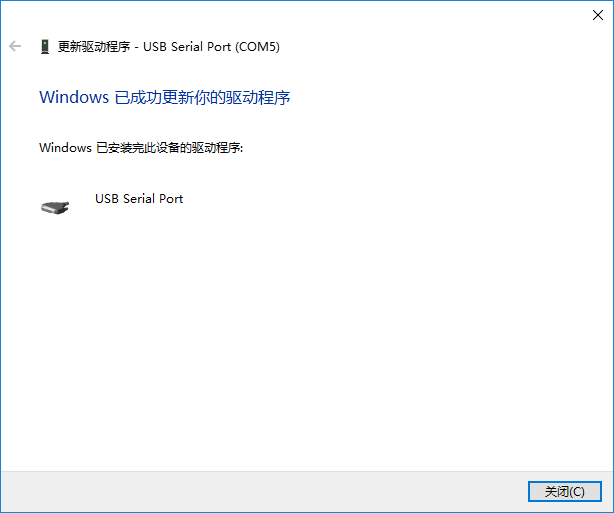
设置好之后,重新手动安装,注意这里需要安装三次驱动。分别是:

图3

图4

图5

1.4 下载 superboot 到 mini2440 开发板上

使用 oflash 开始烧写 superboot

superboot 镜像路径:mini2440光盘\images\Superboot2440.bin
开发板上电(不管是 nor 还是 nand 启动都行),使用 OpenJTAG 连接好开发板和电脑,运行 cmd 程序,切换到 superboot 所在目录,依次执行:

1
2
3
4
5
6
7
8
9
10
11
12
13
14
15
16
17
18
19
20
21
22
23
24
25
26
27
28
29
30
31
32
33
34
35
36
37
38
39
40
41
42
43
44
45
46
47
48
49
50
51
52
53
54
55
56
E:\Material\mini2440\FriendlyARM-2440-DVD\images>oflash Superboot2440.bin

+---------------------------------------------------------+
| Flash Programmer v1.5.2 for OpenJTAG of www.100ask.net|
| OpenJTAG is a USB to JTAG & RS232 tool based FT2232 |
| This programmer supports both of S3C24X0 & S3C6410 |
| Author: Email/MSN(thisway.diy@163.com), QQ(17653039) |
+---------------------------------------------------------+
Usage:
1. oflash, run with cfg.txt or prompt
2. oflash [file], write [file] to flash with prompt
3. oflash [-f config_file]
4. oflash [jtag_type] [cpu_type] [flash_type] [read_or_write] [offset] [file]
Select the JTAG type:
0. OpenJTAG
1. Dongle JTAG(parallel port)
2. Wiggler JTAG(parallel port)
Enter the number: 0
Select the CPU:
0. S3C2410
1. S3C2440
2. S3C6410
Enter the number: 1

device: 4 "2232C"
deviceID: 0x14575118
SerialNumber: FThecwJmA
Description: USB<=>JTAG&RS232 AS3C2440 detected, cpuID = 0x0032409d

[Main Menu]
0:Nand Flash prog 1:Nor Flash prog 2:Memory Rd/Wr 3:Exit
Select the function to test:1
Detect Nor Flash ...
AMD AM29LV160DB
Size: 2 MB

Image Size: 0x40000

Available Target Offset:

Bank # 1: AMD AM29LV160DB FLASH (16 x 16) Size: 2 MB in 35 Sectors
AMD Standard command set, Manufacturer ID: 0x01, Device ID: 0x2249
Erase timeout: 30000 ms, write timeout: 100 ms

Sector Start Addresses:
00000000 00004000 00006000 00008000 00010000
00020000 00030000 00040000 00050000 00060000
00070000 00080000 00090000 000A0000 000B0000
000C0000 000D0000 000E0000 000F0000 00100000
00110000 00120000 00130000 00140000 00150000
00160000 00170000 00180000 00190000 001A0000
001B0000 001C0000 001D0000 001E0000 001F0000
Input target offset:0
Erasing ....... done
write ...
100%done

验证是否烧录成功

mini2440 切换到 nor 启动,连接串口终端,出现如下提示则表示烧录成功。

1
2
3
4
5
Superboot-2440 V1.5(20150414) by FriendlyARM

Booting from NOR
Try to find SD card...... not found.
Hello USB Loop

二. 使用 miniTool 刷机

2.1 安装 miniTools 工具

miniTools 安装包路径:mini2440光盘\windows平台工具\MiniTools-USB下载工具\MiniToolsSetup-Windows-20150528.exe
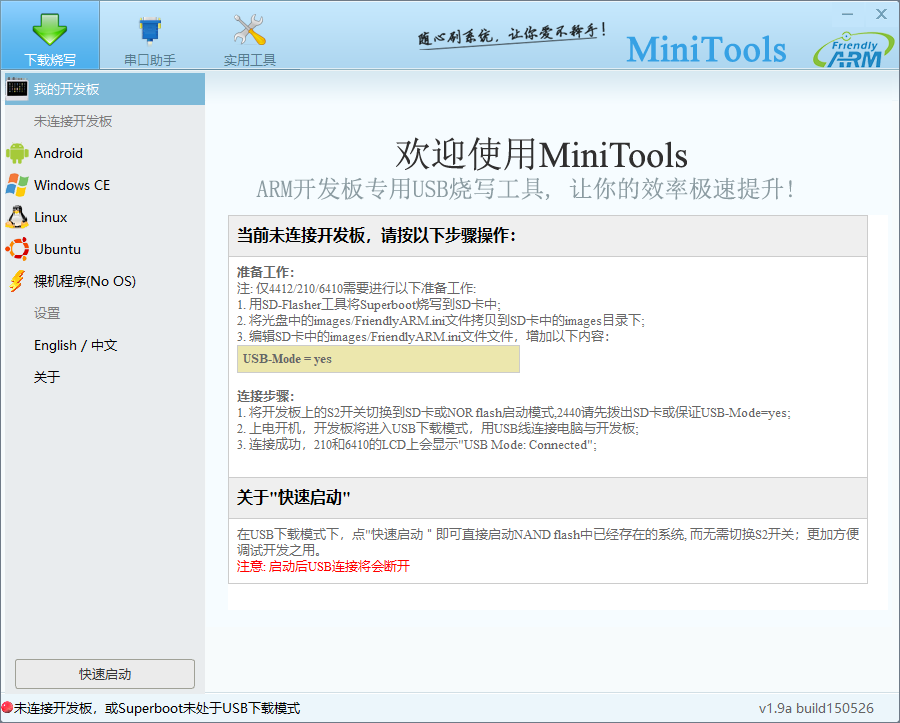
Windows 平台下安装 MiniTools 工具,双击安装即可。安装好后桌面会出现 miniTools 应用的图标,双击执行效果为:

图6

2.2 安装 mini2440 驱动程序

mini2440 usb 驱动程序路径:
mini2440光盘\windows平台工具\usb下载驱动\FriendlyARM USB Download Driver Setup_20090421.exe
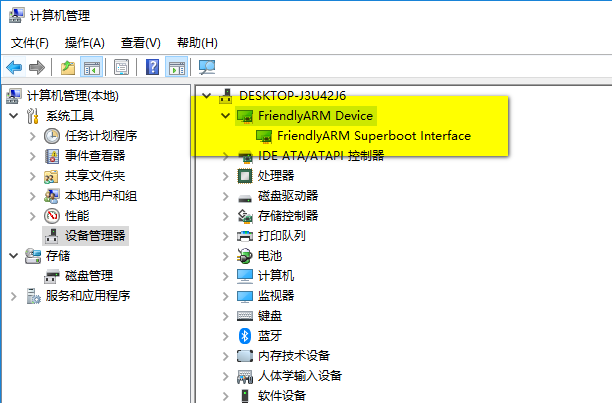
直接安装无法安装上,同样需要用 usb 线连接好了 mini2440 后在设备管理器下手动去安装驱动,针对 Win 8 和 Win 10 也是需要强制关闭数字签名后才能安装的上。
驱动安装成功后设备管理器截图:

图7

2.3 使用 miniTools 给 mini2440 刷系统

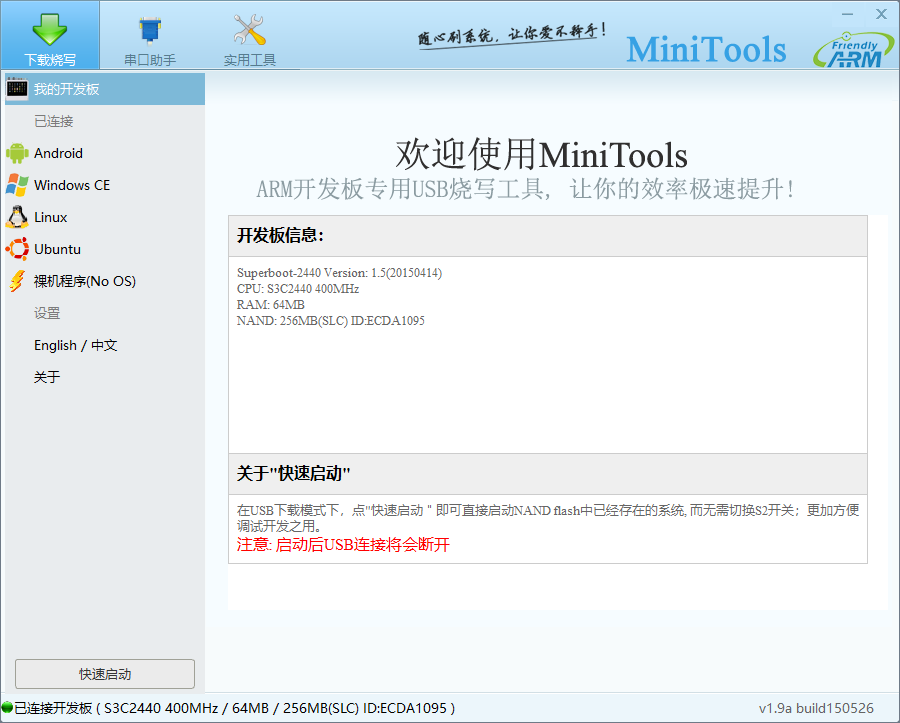
使用 usb 线连接好 mini2440 和电脑,mini2440 使用 nor 启动,然后运行 miniTools,此时显示的是开发板信息。

图8

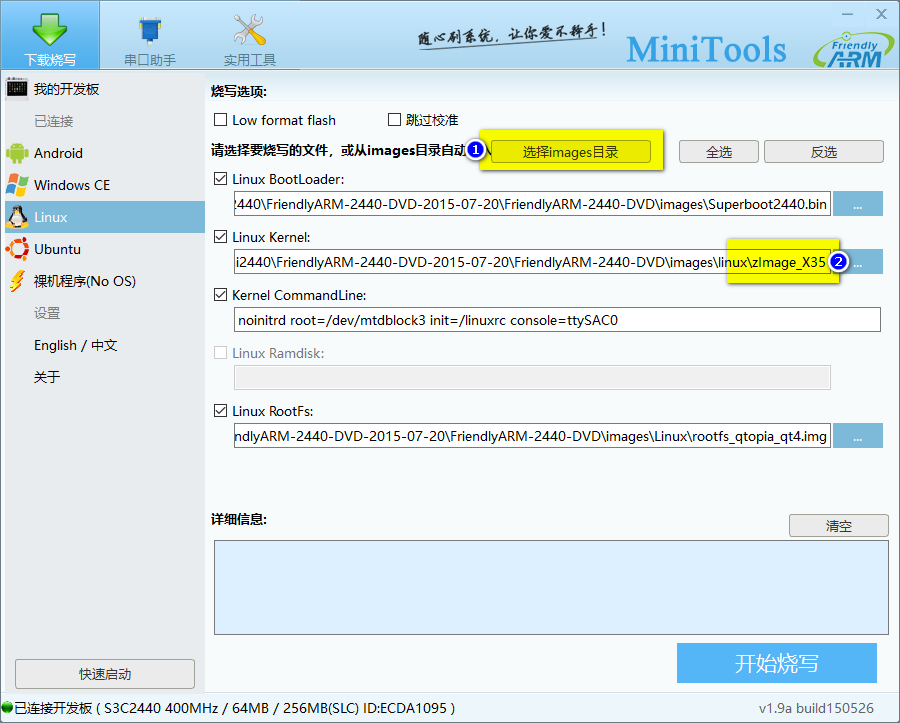
切换到 linux 选项下,直接选择从光盘目录中的 image 目录自动导入,然后修改好自己手头上 mini2440 搭配的屏即可开始烧写。

点击开始烧写,等待烧写完成。

图9

2.4 验证是否烧写成功

mini2440 切换到 nand 启动模式,开机,看是否能成功启动 kernel,这里贴出部分开机 log:

1
2
3
4
5
6
7
8
9
10
11
12
13
14
15
16
17
18
19
20
21
22
23
24
25
26
Superboot-2440 V1.5(20150414) by FriendlyARM

Booting from NAND
Load Kernel...
Uncompressing Linux...............................................................................................................................
....................... done, booting the kernel.
Linux version 2.6.32.2-FriendlyARM (root@tzs-ThinkPad-X201) (gcc version 4.4.3 (ctng-1.6.1) ) #16 Tue Dec 23 15:08:43 CST 2014
CPU: ARM920T [41129200] revision 0 (ARMv4T), cr=c0007177
CPU: VIVT data cache, VIVT instruction cache
Machine: FriendlyARM Mini2440 development board
ATAG_INITRD is deprecated; please update your bootloader.
Memory policy: ECC disabled, Data cache writeback
CPU S3C2440A (id 0x32440001)
S3C24XX Clocks, (c) 2004 Simtec Electronics
S3C244X: core 405.000 MHz, memory 101.250 MHz, peripheral 50.625 MHz
CLOCK: Slow mode (1.500 MHz), fast, MPLL on, UPLL on
... ... ... ...
Freeing init memory: 156K
hwclock: settimeofday() failed: Invalid argument
[01/Jan/1970:00:00:12 +0000] boa: server version Boa/0.94.13
[01/Jan/1970:00:00:12 +0000] boa: server built Jul 26 2010 at 15:58:29.
[01/Jan/1970:00:00:12 +0000] boa: starting server pid=697, port 80
Try to bring eth0 interface up......eth0: link down
Done
Please press Enter to activate this console. eth0: link up, 100Mbps, full-duplex, lpa 0xC1E1
[root@FriendlyARM /]#

最后能出现控制台说明 kernel 正常启动了。

三. 编译 linux-2.6.32.2 内核

3.1 准备好开发环境

需要创建一个 Ubuntu 虚拟机,并且安装好 VMwareTools 方便和 Windows 之间传文件。
创建好一个 mini2440 的工作目录,后续所有 mini2440 相关的文件均存放在此目录下。

1
user@vmware:~$ mkdir -p workspace/mini2440

3.2 安装交叉编译器

在 mini2440 工作目录下创建 package 目录,存放软件包。

1
user@vmware:~$ mkdir workspace/mini2440/package

拷贝 mini2440光盘\Linux\arm-linux-gcc-4.4.3.tar.gz 到虚拟机 /home/user/workspace/mini2440/package 目录下。
解压到 /opt 目录下并配置好环境变量.

1
2
3
4
5
user@vmware:~$ cd workspace/mini2440/package/
user@vmware:~/workspace/mini2440/package$ sudo tar zxf arm-linux-gcc-4.4.3.tar.gz -C /
user@vmware:~/workspace/mini2440/package$ cd
user@vmware:~$ echo "export PATH=\$PATH:/opt/FriendlyARM/toolschain/4.4.3/bin" >> .bashrc
user@vmware:~$ . .bashrc

验证交叉编译器是否安装成功。

1
2
user@vmware:~$ arm-linux-gcc -v
/opt/FriendlyARM/toolschain/4.4.3/bin/arm-linux-gcc: 15: exec: /opt/FriendlyARM/toolschain/4.4.3/bin/.arm-none-linux-gnueabi-gcc: not found

没有正确的显示版本号,百度查了一下,原因是虚拟机的 Ubuntu 是 64 位的,而此交叉编译器是 32 位的版本,要想正常使用,需要安装 32 位兼容库。

1
2
user@vmware:~$ sudo apt-get install lib32ncurses5
user@vmware:~$ sudo apt-get install lib32z1

安装好兼容库之后,验证成功。

1
2
3
4
5
6
7
8
9
10
11
12
user@vmware:~$ arm-linux-gcc -v
Using built-in specs.
Target: arm-none-linux-gnueabi
Configured with: /opt/FriendlyARM/mini2440/build-toolschain/working/src/gcc-4.4.3/configure --build=i386-build_redhat-linux-gnu --host=i386-build_
redhat-linux-gnu --target=arm-none-linux-gnueabi --prefix=/opt/FriendlyARM/toolschain/4.4.3 --with-sysroot=/opt/FriendlyARM/toolschain/4.4.3/arm-n
one-linux-gnueabi//sys-root --enable-languages=c,c++ --disable-multilib --with-arch=armv4t --with-cpu=arm920t --with-tune=arm920t --with-float=sof
t --with-pkgversion=ctng-1.6.1 --disable-sjlj-exceptions --enable-__cxa_atexit --with-gmp=/opt/FriendlyARM/toolschain/4.4.3 --with-mpfr=/opt/Frien
dlyARM/toolschain/4.4.3 --with-ppl=/opt/FriendlyARM/toolschain/4.4.3 --with-cloog=/opt/FriendlyARM/toolschain/4.4.3 --with-mpc=/opt/FriendlyARM/to
olschain/4.4.3 --with-local-prefix=/opt/FriendlyARM/toolschain/4.4.3/arm-none-linux-gnueabi//sys-root --disable-nls --enable-threads=posix --enabl
e-symvers=gnu --enable-c99 --enable-long-long --enable-target-optspace
Thread model: posix
gcc version 4.4.3 (ctng-1.6.1)

3.3 配置 linux 内核

同样将 mini2440光盘\Linux\linux-2.6.32.2-mini2440-20150709.tgz 文件拷贝到虚拟机 /home/user/workspace/mini2440/package 目录下。
解压开来,可以看到有很多的配置文件,当然还是挑自己板子搭配屏的配置文件。

1
2
3
4
5
6
7
8
9
10
11
12
13
14
15
user@vmware:~/workspace/mini2440/package$ tar zxf linux-2.6.32.2-mini2440-20150709.tgz -C ../
user@vmware:~/workspace/mini2440/package$ cd ../linux-2.6.32.2/
user@vmware:~/workspace/mini2440/linux-2.6.32.2$ ls
arch config_mini2440_s70d drivers net
block config_mini2440_t35 firmware README
build.sh config_mini2440_td35 fs REPORTING-BUGS
config_mini2440_a70 config_mini2440_vga1024x768 include samples
config_mini2440_a70i config_mini2440_vga640x480 init scripts
config_mini2440_h43 config_mini2440_vga800x600 ipc security
config_mini2440_l80 config_mini2440_w35 Kbuild sound
config_mini2440_n35 config_mini2440_x35 kernel tools
config_mini2440_n43 COPYING lib usr
config_mini2440_p35 CREDITS MAINTAINERS virt
config_mini2440_p43 crypto Makefile
config_mini2440_s70 Documentation mm

开始配置,拷贝配置文件,执行 make menuconfig 生成对应 C 语言配置宏文件和 Makefile 编译宏控文件。

1
2
3
4
5
6
7
8
9
10
11
12
13
14
15
16
17
18
19
20
21
22
23
24
25
26
27
28
29
30
31
32
33
user@vmware:~/workspace/mini2440/linux-2.6.32.2$ make distclean
user@vmware:~/workspace/mini2440/linux-2.6.32.2$ cp config_mini2440_x35 .config
user@vmware:~/workspace/mini2440/linux-2.6.32.2$ make menuconfig
HOSTCC scripts/basic/fixdep
HOSTCC scripts/basic/docproc
HOSTCC scripts/basic/hash
HOSTCC scripts/kconfig/conf.o
scripts/kconfig/conf.c: In function ‘conf_sym’:
scripts/kconfig/conf.c:159:6: warning: variable ‘typeset but not used [-Wunused-but-set-variable]
int type;
^
scripts/kconfig/conf.c: In function ‘conf_choice’:
scripts/kconfig/conf.c:231:6: warning: variable ‘typeset but not used [-Wunused-but-set-variable]
int type;
^
scripts/kconfig/conf.c:307:4: warning: ignoring return value of ‘fgets’, declared with attribute warn_unused_result [-Wunused-result]
fgets(line, 128, stdin);
^
scripts/kconfig/conf.c: In function ‘conf_askvalue’:
scripts/kconfig/conf.c:105:3: warning: ignoring return value of ‘fgets’, declared with attribute warn_unused_result [-Wunused-result]
fgets(line, 128, stdin);
^
HOSTCC scripts/kconfig/kxgettext.o
*** Unable to find the ncurses libraries or the
*** required header files.
*** 'make menuconfig' requires the ncurses libraries.
***
*** Install ncurses (ncurses-devel) and try again.
***
/home/user/workspace/mini2440/linux-2.6.32.2/scripts/kconfig/Makefile:186: recipe for target 'scripts/kconfig/dochecklxdialog' failed
make[1]: *** [scripts/kconfig/dochecklxdialog] Error 1
Makefile:454: recipe for target 'menuconfig' failed
make: *** [menuconfig] Error 2

报错了,提示说需要 ncurses 库,安装好库之后,成功配置。

1
2
user@vmware:~/workspace/mini2440/linux-2.6.32.2$ sudo apt-get install libncurses
user@vmware:~/workspace/mini2440/linux-2.6.32.2$ sudo apt-get install ncurses-dev

进入图形化配置界面后,直接按 esc 退出即可,配置项已经拷贝到最终的配置文件 .config 文件中了,执行 make menuconfig 的作用,只是去自动生成 Makefile 和 c 语言宏控文件。

3.4 编译内核

配置 ok 了,要开始编译内核了。

1
2
3
4
5
6
7
8
9
10
11
12
13
user@vmware:~/workspace/mini2440/linux-2.6.32.2$ make
CHK include/linux/version.h
UPD include/linux/version.h
Generating include/asm-arm/mach-types.h
CHK include/linux/utsrelease.h
UPD include/linux/utsrelease.h
SYMLINK include/asm -> include/asm-arm
CC kernel/bounds.s
/opt/FriendlyARM/toolschain/4.4.3/libexec/gcc/arm-none-linux-gnueabi/4.4.3/cc1: error while loading shared libraries: libstdc++.so.6: cannot open shared object file: No such file or directory
/home/user/workspace/mini2440/linux-2.6.32.2/./Kbuild:35: recipe for target 'kernel/bounds.s' failed
make[1]: *** [kernel/bounds.s] Error 1
Makefile:982: recipe for target 'prepare0' failed
make: *** [prepare0] Error 2

可是又报错了,提示说是找不到 libstdc++.so.6 这个库。安装一下试试:

1
user@vmware:~/workspace/mini2440/linux-2.6.32.2$ sudo apt-get install lib32stdc++6

库安装好了之后,果然可以开始编译了。

1
2
3
4
5
6
7
8
9
10
user@vmware:~/workspace/mini2440/linux-2.6.32.2$ make
... ... ... ...
CC kernel/exit.o
CC kernel/itimer.o
TIMEC kernel/timeconst.h
Can't use 'defined(@array)' (Maybe you should just omit the defined()?) at kernel/timeconst.pl line 373.
/home/user/workspace/mini2440/linux-2.6.32.2/kernel/Makefile:129: recipe for target 'kernel/timeconst.h' failed
make[1]: *** [kernel/timeconst.h] Error 255
Makefile:878: recipe for target 'kernel' failed
make: *** [kernel] Error 2

可是又报错了,看提示说 ‘defined(@array)’语法有问题,将 kernel/timeconst.pl 文件中 373 行 “if (!defined(@val)) {“ 修改为 “if (!@val) {“ 后编译成功。

1
2
3
4
5
6
7
8
9
10
11
12
13
diff --git a/kernel/timeconst.pl b/kernel/timeconst.pl
index eb51d76..0461239 100644
--- a/kernel/timeconst.pl
+++ b/kernel/timeconst.pl
@@ -370,7 +370,7 @@ if ($hz eq '--can') {
}

@val = @{$canned_values{$hz}};
- if (!defined(@val)) {
+ if (!@val) {
@val = compute_values($hz);
}
output($hz, @val);

编译成功提示如下,同时会在 arch/arm/boot/ 目录下生成 zImage 内核镜像文件。

1
2
3
4
5
6
7
8
9
10
11
12
13
user@vmware:~/workspace/mini2440/linux-2.6.32.2$ make
CHK include/linux/version.h
make[1]: 'include/asm-arm/mach-types.h' is up to date.
CHK include/linux/utsrelease.h
SYMLINK include/asm -> include/asm-arm
CALL scripts/checksyscalls.sh
CHK include/linux/compile.h
Kernel: arch/arm/boot/Image is ready
Kernel: arch/arm/boot/zImage is ready
Building modules, stage 2.
MODPOST 16 modules
user@vmware:~/workspace/mini2440/linux-2.6.32.2$ ls -l arch/arm/boot/zImage
-rwxrwxr-x 1 user user 2330052 11月 25 03:10 arch/arm/boot/zImage

四. 使用 nfs 传输文件

4.1 Ubuntu 安装 nfs 服务器

NFS 介绍

NFS 即网络文件系统(Network File-System),可以通过网络让不同机器、不同系统之间可以实现文件共享。通过 NFS,可以访问远程共享目录,就像访问本地磁盘一样。在 ubuntu 主机上安装 nfs 服务器,开发板便可以通过网络访问 ubuntu 主机上的共享的文件。

ubuntu 下安装 nfs 服务器。

1
2
user@vmware:~$ sudo apt-get install nfs-kernel-server # 安装 NFS 服务器端
user@vmware:~$ sudo apt-get install nfs-common # 安装 NFS 客户端

配置 nfs 共享目录

安装完 NFS 服务器后,需要指定共享的 NFS 目录,其方法是在 “/etc/exports” 文件里面设置对应的目录及相应的访问权限,每一行对应一个设置。
配置 /home/user/board/ 目录为 nfs 共享的目录,需要修改 “/etc/exports” 文件,添加一行:

1
/home/user/board/ *(rw,sync,no_root_squash)

建立 nfs 共享文件夹

修改完成后,保存并退出 /etc/exports 文件。然后新建 /home/user/board 目录,并为该目录设置最宽松的权限:

1
2
3
user@vmware:~$ sudo mkdir -p /home/user/board
user@vmware:~$ sudo chmod -R 777 /home/user/board
user@vmware:~$ sudo chown –R nobody /home/user/board

开启 nfs 服务器

1
2
user@vmware:~$ sudo /etc/init.d/nfs-kernel-server start   # 开启 nfs 服务器
user@vmware:~$ sudo /etc/init.d/nfs-kernel-server restart # 重启 nfs 服务器

4.2 开发板挂载 nfs 共享目录

开发板接好网线,保证开发板和虚拟机在同一个局域网下,执行以下命令,挂载 /home/user/board 目录到开发板的 /mnt 目录下。

1
2
[root@FriendlyARM /]# ifconfig eth0 192.168.1.111
[root@FriendlyARM /]# mount -t nfs 192.168.1.110:/home/user/board /mnt -o nolock

其中 192.168.1.100 是 Ubuntu 虚拟机 ip 地址,/home/user/board 是虚拟机 nfs 服务器共享的目录。

坚持原创技术分享,您的支持将鼓励我继续创作!